Monday, August 29, 2022

Clash of Spears - Summer 2022 Georgia Tournament!

I gathered this past Saturday, Aug. 27, with a group of wargamers to participate in the Clash of Spears Summer 2022 tournament at Giga-Bites Cafe in Marietta.

The tournament was hosted by my friends Alvaro and Francisco Erize - the amazing duo of brothers at the heart of Fighting Hedgehog and authors of the award-winning Clash of Spears rules.

Due to life circumstances, I've not been able to game in a long, long, time. But now that things have changed for the better, when I heard about the tournament I was eager to attend. I just needed to finish painting an army - so I stepped up and did what I usually do: I waited until the last moment and worked like mad to get a Celtiberian force painted up in time. Fortunately, I succeeded and showed up on the day with a fully-painted 900-point Celtiberian warband! (I will write on the painting saga in a later post.)

There were about nine other warlords vying for the famed Clash gladius, though that number would vary throughout the day as some had to leave early. 

My tournament after-action report will be told mostly in pictures and descriptions, rather than a boring, dry verbal account.

Once I arrived and the tables were set up (which I have to say, were beautiful), it was time to fight! Just my luck, I was paired against Alvaro in the first game - great. My first foray back into wargaming in many years, and I was faced with one of the game's designers! I did not expect this game to be easy, and I was right.

My deployment, and my first mistake. With two leaders, I should not have split my forces into three divisions. That meant my Lvl 4 leader would have to try and stay centered all battle in order to be able to give orders to two formations.

The right side, my left, of the Roman line. A nice. strong, compact formation.

The left, my right, of the Roman army. Light troops flanking the shield wall.

My Celtiberian nobles and a Lvl 3 leader form up on the flank.

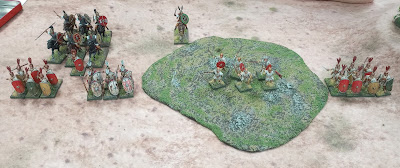
Overview of the initial deployment. Observant players will already see that I am going to have trouble concentrating enough force to break the enemy line.

On my right, the caetrati and slingers face a well-drilled Roman formation. They would eventually see off the caetrati and assault into the slingers.

The scutarii look on as a unit of caetrati advances to contest the objective.

Clash of Spear measurement gauges come in very handy when making sure your troops stop just outside of enemy missile range,

On my left, top in this picture, Alvaro's Romans have advanced steadily towards the objective while maintaining a strong formation. At the bottom, the enemy eye each other earily over the second objective.

I took advantage of an opportunity to charge with my nobles, doing very little damage, before riding away back to a safe distance.

The Roman troops, having dispatched the caetrati, secure the objective by charging into and pushing back the slingers. 

At this point, the Romans held both objectives. Combined with heavy losses among my caetrati, this was enough to force a break test which I failed, conceding the field of battle to the Romans.

At the left objective, I still had enough force to cause some damage, had the leaders not decided that discretion is the better part of valor and fled!

The outcome was never in doubt, and my Celtiberians abandoned the field to Alvaro's Romans, awarding him a major victory. I managed to salvage a single victory point - not an auspicious start to the campaign.

The second game would be a skirmish between similar forces as my Celtiberians took on Kenny's Iberians in an internecine peninsular clash.

Kenny and I, right, prior to our match. Pardon the lunch detritus in the foreground, but Clashing makes one hungry.

The Celtiberian line, a much more compact formation than the previous battle.

Initial deployment, with the objective markers (the top objective is hidden in the structure). This was the retrieval scenario, with the hidden object in one of the randomly selected objectives. Until we knew which, we'd have to contest them all.

On the right, the caetrati advance towards the objective.

Slingers start peppering the enemy, caught in the open, with stones, diminishing their ranks.

State of the opposing forces after the first turn. My line is still holding together well.

A solid line of Celtiberians.

The slngers, having devastated one unit of enemy troops, turn their attention to the one securing the center objective, which, as the fates would have it, contained the hidden valuable. The enemy gains the advantage.

On the left, the caetrati soften up the opposing cavalry before being charged and taking some losses. Still, their javelins took their toll.

The weakened cavalry was no match for the charge of the scutarii, who decimated them!

At this point, though the enemy had possession of the treasure, the Celtiberians were solidly in control of the field. Due to their losses, the Iberians were forced to take a break test and fled, abandoning the sacred item that had cost them so much in sweat and blood. 

This game went much more my way, with the Celtiberians gaining a major victory! The nine points from this battle got me to 10 total points, firmly in the middle but still with an outside shot at the champion's gladius if things went well in the third game.

For that crucial game, I faced off against Brett and his heavily armored Romans - this would be a tough test indeed.

Once again, the Celtiberians face a heavily armored, compact formation of Romans.
Apart from a unit of velites on the hill, the Romans were all heavily armored with big shields to absorb missile attacks.

The wild Celtiberian caetrati rush screaming from the woods. Perhaps next time, quietly staying in cover would be more effective...

The one real tactical mistake I can point to that my opponent made - his cavalry charged unsupported and were caught alone and in the open.

Not one to pass up an opportunity, the leader orders the scutarii to break formation and throw their spears, impaling the the horses and riders under a storm of sharp steel. The eerie cries of dying horses could be heard across the battlefield.

Emboldened by the success of the scutarii, the caetrati charge a wall of Roman shields - with little effect other than to die upon Roman spearpoints.

Don't let the apparently disordered Roman line fool you - at this point they are still in a very strong defensive position keeping my troops away from the objective.

After butchering the caetrati, and the scutarii next, the Romans command the center. 

I managed to salvage some respectability by charging my cavalry into the enemy deployment zone, but it was too little, too late. I failed the break test convincingly, handing Brett a major victory.

In the end, the might of Rome prevailed again as the Celtiberians really weren't able to score enough damaging hits, while getting punished in return. Brett's major victory was a crushing defeat for my troops, and the two victory points I was able to salvage left me with 11 total - tied for fifth in the overall standings, firmly and solidly mediocre.

My impressions on the day:

First, Alvaro and Francisco put on a terrific tournament. Each and every table had beautiful well-placed scenery that truly enhanced the gaming experience. And the brothers were gracious hosts, moving from table to table to answer the myriad of rules questions and comment on the ebbs and flows of the games.

Secondly, the level of good sportsmanship was tremendously high. The competition was fierce, but there was no sense of the uber-competitive, win-at-all-costs, attitude I have sometimes seen at other events. Yes, everyone was out to win, but all of my opponents were fair and kind. Moves and countermoves were discussed before decisions were made, and rules queries were addressed politely.

It was a pleasure to compete and enjoy a day of fellowship with such a great group of guys. Despite the thrashing my army took at the hands of the Romans, I am eager to send them back into the fray.

I am planning on adding some units with heavier armor, but that will mean fewer skirmishers... or smaller units... or different leaders...

Choices, choices.

I have decided on one thing - next time, the gladius will be mine! Oh yes, my precious, it will be mine!

'Til next time.

Friday, August 26, 2022

Basing wargaming figures (hiding plastic bases)

Recently, in a conversation about Clash of Spears, a player asked about hiding the "puddle" bases that are prevalent on historical wargaming figures.

Since I am in the middle of trying to get a Celt-Iberian warband finished in time for a tournament, and I am currently doing the bases on 34 figures, I felt it would be a good time to share my method.

Keep in mind, there are many, many other ways to do this. Some people cut off the puddles and glue the figures directly to the gaming base. Others use putty to build up the area around the puddle. And others may not be bothered by the appearance of the puddle at all.

This is the method that works for me and gives me results I am happy with.

The first step is to glue the figure to the final base. In the case of my example, I am using a square base, but the technique works for any shape base.

The "puddle" base sticks out when glued to a regular base.
The "puddle" base can be clearly seen when glued to a regular base.

The first step is to cover the entire base with glue. I use carpenter's glue because I like the thicker consistency. But regular PVA (Elmer's white glue) works also.


Cover the entire base, including the puddle, in glue.

Step two is to dip your figure in sand and shake off the excess. I use sand that I got from the beach, sifted to get rid of the coarser grains. Beach sand is cheap (free!) and last time I went to the beach several years ago I brought back enough to last me for years. Sifting is a bit of a pain, but necessary to get rid of shell fragments and to get a more consistent size of sand for basing.


Dip the figure's base in sand.

As you can see, the puddle base is still clearly evident.

After the first dip in sand, the puddle can still be seen.

The next step then is to equalize the level of sand around the base. For this I use a scenic cement, applied with a needle applicator.

I make my own scenic cement (4.5 parts water, 4.5 parts PVA, 1 part isopropyl alcohol) and it works well for me. Woodland Scenics makes a similar product if you want to buy it ready to go.

Scenic cement in a needle applicator bottle.

The next step is to apply the cement only to the lower areas of the base. That is why I use a needle applicator in order to get the cement exactly where I want it.

The scenic cement is applied around the puddle base.

Finally, dip the model in the sand once again, knocking off the excess. This should level out the sand on the base, minimizing the appearance of the puddle base. In the case of some puddle bases that may be quite a bit taller, you may need to repeat this step.

The puddle base is no longer so apparent.

After this I paint my bases, add a little grass for visual interest, and voila! A completed, based figure.

A completed base.

I hope you found this brief tutorial helpful/educational. Please let me know what you think in the comments, and share your preferred method for basing. One of the great aspects of this hobby is learning from and encouraging each other.

'Til next time!


Monday, February 28, 2022

Modeling on the go! Building Celtiberians during dinner break...

The recent launch of the Kickstarter for Clash of Katanas got me thinking about Clash of Spears again, and the Iberian force I started a couple of years ago.


Since that time, I've decided to build a Celtiberian force instead, but one that can also function as an Iberian warband due to the similarities. Why the change? Well, I've learned that there's a good chance my ancestors were Celtiberian. The ancestral home of one of the Spanish branches of the family is located in the Cameros region, just between Soria and Logrono. Soria is the site of the ruins of the ancient Celtiberian city of Numantia, which was destroyed by the inhabitants rather than surrender it to the Roman besiegers. I don't think it's a stretch to believe Celtiberian blood flows through my veins!


Because my hobby time is practically non-existent, I decided to make use of the dinner break at work. I packed up basic tools and was ready to go.


I clipped the parts I would need from the sprues (I'm using Victrix Iberian warriors, in this case the unarmored ones) so they'd just need cleaning up and gluing. I brought a couple of hobby knives, plastic glue, and my magnifiers (the eyes are getting older).


The first night I was able to get all the parts cleaned of flash, and assemble two of the warriors. After all, I also need to eat during that time!


The second night I finished the ten remaining warriors. A unit of 12 completed.

The third night I was able to get another 12 warriors completed: four Celtiberians and eight Iberians.

I'm pretty happy with the progress. I was able to get something to eat, and still complete 24 figures in three dinner breaks.

All that's left is to base them and paint them, and then get their shields sorted. I have some time off scheduled next week, and I'm hoping to be able to finish these warriors as well as paint up my Imperial Guard squad for Kill Team.

'Til next time!

Tuesday, January 11, 2022

Creating a Kill Team for the 2021 version of the game


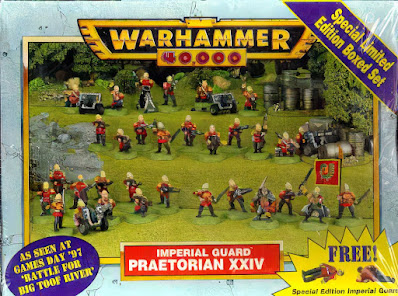
A while back I told my son about an idea I had for an Imperial Guard regiment based on the British Natal Native Contingent from the Zulu Wars using Praetorian officers and Tallarn troops. I used to have the Praetorian boxed set as a start to making this force, but circumstances forced me to sell it many, many years ago.

Limited edition Praetorian XXIV boxed set from Games Workshop.

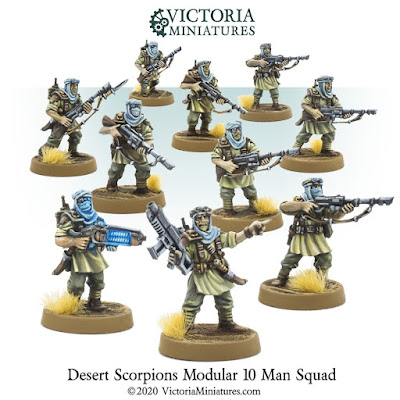
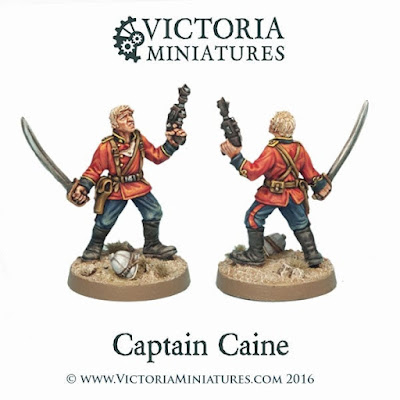
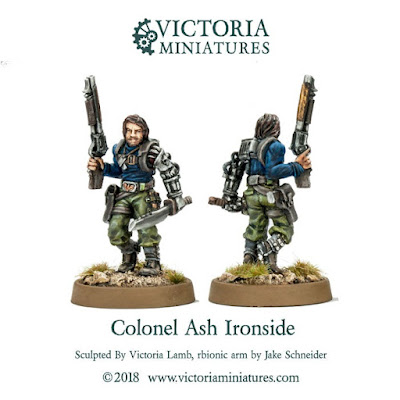
My son, Lucas, remembered that and for Christmas this year got me some figures from Victoria Miniatures to make a Kill Team based on that concept. (I cannot tell you how moved I was by his gift - that he would remember something like that and act on it was very thoughtful!) Victoria Miniatures is an Australian company, but they now have a US-based distributor and they make “not” GW Imperial Guard units. Lucas got me a squad of the “Desert Scorpions” (not-Tallarn), and one of their character figures  - a Praetorian officer based on Michael Caine's character from the movie "Zulu."


Since the release of the Octarius boxed set for Kill Team included rules for a Veteran Guardsman team, with more options and detail than a standard Imperial Guard team, I decided to build them as a Veteran Guardsman squad. This meant digging into my bits box and planning out exactly how I was going to assemble the figures, since many of them would need to be non-standard infantrymen.

In the end, I ordered a few more figures from Victoria Miniatures to fill out the roster and have a complete Veteran Guardsman Kill Team with all the options. I ordered the Desert Scorpions Heavy Weapon Crew, as well as the Colonel Ash Ironside character figure.


The Victoria figures are great quality, consisting of resin castings and 3d printed components. Once I had planned out my builds, I was able to assemble them without any issues at all.

My Kill Team consists of:

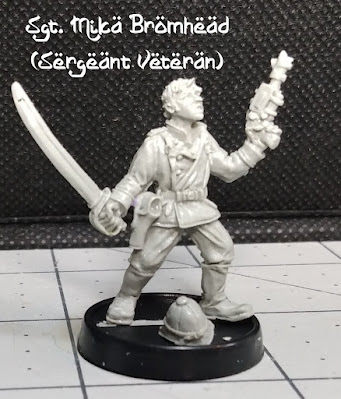
  • Sgt. Mika Bromhead (Sergeant Veteran)

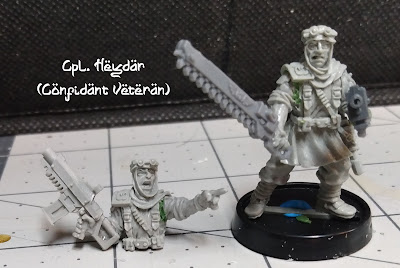
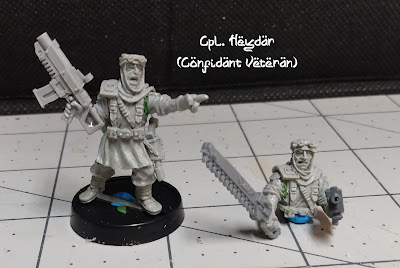
  • Cpl. Heydar (Confidant Veteran)

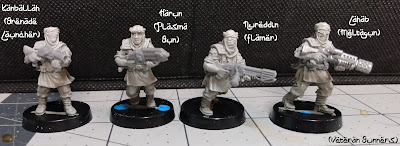
  • Lahab (Veteran Gunner with a meltagun)

  • Harun (Veteran Gunner with a plasma gun)

  • Kanballah (Veteran Gunner with a grenade launcher)

  • Nureddin (Veteran Gunner with a flamer)

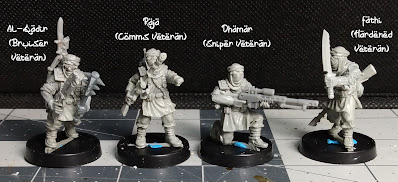
  • Dhamar (Sniper Veteran)

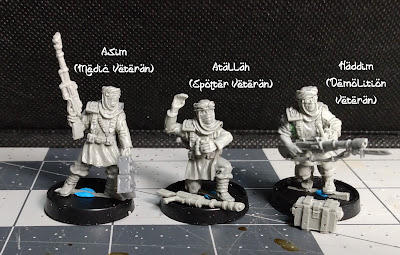
  • Asim (Medic Veteran)

  • Raja (Comms Veteran)

  • Atallah (Spotter Veteran)

  • Haddim (Demolition Veteran)

  • Fathi (Hardened Veteran)

  • Al-Qadir (Bruiser Veteran)

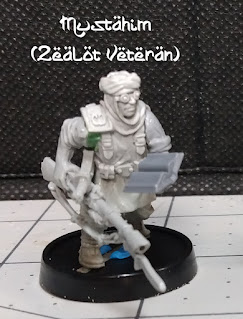
  • Mustahim (Zealot Veteran)

  • Ameen (Trooper Veteran)

  • Boutros (Trooper Veteran)

  • Zahir (Trooper Veteran)

  • Farid (Trooper Veteran)

Sgt. Bromhead was assembled as per the instructions, as were the four trooper veterans and the four gunners.


When looking at the stats for the Confidant Veteran, I could not make up my mind whether to arm him with a pistol and chainsword, or with a boltgun. Fortunately, I did not need to choose. The Desert Scorpions set comes with 10 sets of legs, but 12 torsos. This let me build two torsos for Cpl. Heydar, and magnetize them so I can easily swap him out between both weapons options.


This still left one extra torso, which was very handy since the Heavy Weapons crew set has six torsos and seven sets of legs. Between both sets this let me build an extra figure (in this case, the sniper Dhamar).

I did not use the backpacks that came with the Desert Scorpions, since in my opinion the canteens and daggers are plenty. This left me with many left over, which I used to build my specialists. Since they have a small antenna, I felt the backpack could easily represent a vox-unit, so I used one on Raja (the comms veteran). By removing the antenna, the packs can easily work as medikits, especially if I paint them white and put a red cross on them. This took care of Asim, the medic.

The Heavy Weapons crew comes with a hand holding a detonator, and a hand holding binoculars. This made easy work of the spotter and demolition veterans.

The last three were the most fun, and the required the most thought. I was able to find a hand, and an open book, among my bits and used them to build an arm for Mustahim, the zealot, quoting from holy scripture as he wades into battle. I took the bionic arm from the Ash Ironside figure and gave it to Fathi, the hardened veteran. I used a brutal club that looked like it would work to clear trenches in hand-to-hand combat forAl-Qadir, the bruiser. I also gave him the shotgun arm from Ash Ironside (even though it does not have specific rules in the game, I felt it would be another likely weapon for clearing trenches and made the figure look even more brutal).


I have written up a bit of background for them which I will share in a future post. All that is left to do now is paint them, which for me is always a challenge...

'Til next time!

Friday, January 7, 2022

It's back from the dead! Again!

Wow! Nearly four year since I last posted on my blog...

I bet you thought the blog was dead and buried, or maybe I was. Well, the past four years have been quite difficult, but I am still here and looking to get back to some of the things I love, such as gaming and talking about gaming.

Since the last post there has been a lot that happened, globally (the pandemic, of course) and in my personal life. Lots of ups and many downs, financially and emotionally. I was able to do some gaming and quite a bit of photographic train chasing, but that detracted from my search for work and caused me greater difficulties. After getting my priorities back in order, I am again gainfully employed. I started just over three years ago unloading trucks and stocking shelves and was quickly promoted to supervisor and then assistant manager. The long hours and hard physical work of my current management position at the world's largest retailer takes almost all the energy and enthusiasm I have. That leaves very little for my limited spare time. However, it is that very situation that I think makes it such a priority for me to use that spare time to its fullest!

The stress and anxiety of my job, especially during the past three to four months of the world's second Covid-Christmas season, has caused me much emotional, mental and physical stress. I have lost over 50 pounds in the last three years - 15 of those coming in the past three months. I now weigh what I weighed in college - 36 years ago! But, enough about my problems - this is not that type of blog. Maybe one day I will explore those issues, but for now, let's talk gaming!

Besides my need for a creative outlet in my time off work and my love of gaming and modeling in general, what has spurred this resurrection of Plastic Pirates? Well, in August of last year Games Workshop released a new version of Kill Team - their skirmish combat game set in the universe of Warhammer 40,000. If you have followed this blog and/or know me, you know that I am a sucker for skirmish games. With my anemic painting output, completing a large army for a game is something I am very seldom able to accomplish. But, if you only need five to fifteen models for a complete force, that should be doable, right? (We shall see, that may be too ambitious for me!)

The first release was the Octarius boxed set. This included the rules, the terrain and two sets of brand new plastic miniatures - the Death Korps of Krieg (a human Imperial Guard unit with design features reminiscent of World War I German and French troops) and the Ork Kommandos (a funky unit of greenskins borrowing inspiration from many sources as to what special forces look like).


Octarius Boxed Set

Death Korps of Krieg

Ork Kommandos


I didn't immediately get the box, due to budget considerations at the time, and because I wanted to see how well Games Workshop would support the game going forward. Despite grand announcements of a bright future for the game, GW has a somewhat spotty track record when it comes to abandoning games they no longer wish to support.

Well, in September the second boxed set was released, this one called Chalnath. It featured two sets of figures as well as some more terrific terrain. This time it was the Tau (basically alien Socialists) and a squad of Sisters of Battle Novitiates. Sisters of Battle (known as the Adepta Sororitas in the false Latin called High Gothic) are basically nuns in battle armor with big guns and swords. The Novitiates are the nuns in training.


Chalnath Boxed Set


Sisters of Battle Novitiates


Tau Pathfinders

My son Lucas and I decided that it would be a good time to get into this game, due mainly to two reasons:

The first is, again, the scale of the game (small forces playing on a smaller board - 22" x 30" - so no need for a huge armies and a massive 4' x 6' board filled with terrain).

The second, and most important in my mind, is the opportunity the game gives to create unique squads with interesting backgrounds, histories and narratives set in the wider Warhammer 40,000 universe. I enjoy converting and building, whether it is terrain or figures. The small squad size of the Kill Team units makes it possible for me to be creative without needing to convert huge armies.

So we took the plunge and got Chalnath between the two of us. Lucas would take the Sisters, and I would sell the Tau and start on a different Kill Team for myself. Going forward I intend to share my progress (I already have ideas for five or six, at least, different Kill Teams I want to build) more regularly, but we all know about intentions paving a road that leads to a hot place. We'll see what the future holds, but I am hopeful that this new year will bring blessings and good things - and more opportunities for time spent with family, gaming and friends.

God bless you all.

'Til next time! (Hopefully less than four years!)