Friday, January 20, 2023

Making tokens for The Barons' War

As readers of this blog already know, I am getting started with The Barons' War from Footsore. I am at the point where my next step is to actually assemble and paint a retinue. But, as is so often the case, I got slightly sidetracked by an ancillary project.

In addition to the usual stuff (figures, terrain, dice, etc.), the game requires the use of tokens to keep track of actions taken and the status of the troops.

The tokens are available as a free download from Footsore at Warhost Online. You can also buy them pre-printed on MDF.

Because I am a firm believer in "simpler is better," I decided to modify the tokens slightly for my own use.

The modification consists simply of writing on each token what action or status it represents. I know, for most people just seeing the color or the image on the token is enough. But for me, at least initially as I become comfortable with the game, it will be tremendously helpful to have it literally spelled out on the token itself.

The other change I am making is to the size of the token. While a necessary evil in many wargames, I don't like the look of a bunch of tokens besides painted troops and terrain. That is a pet peeve of mine, so I decided to make the tokens just a little smaller (and to match the punch I will use).

The punch I use for bases for 15mm and smaller figures is 3/4" in diameter (I also have a 1" punch I use for bases for 28mm figures). Using Photoshop, I added the text and sized the tokens appropriately. You will notice that I also extended the background colors so that they would look good even if the punch was not lined up perfectly.

Once printed on a sheet of cardstock, all that's left is to punch them out and assemble the tokens. 

The printed token sheet and the hole punch.

I punched the printed tokens out, but I felt they were too thin. I glued a pair of them back to back to make two-sided tokens - still too thin. So, I punched out some thicker cardboard circles.

The tokens and the cardboard filler.

Using a regular glue stick, I pasted the tokens on either side of the cardboard. Perfect! This is tedious, and for many it won't be worth the effort. But I believe that if you're going to do something, you should try to do it right.

Glue stick to the rescue!

Now I have tokens that clearly indicate what they represent, are a bit smaller than the official tokens, and are thick enough to have just a little heft.

Tokens next to a Fireforge sergeant.

Now, I seriously have some figure assembling and painting to get to before I get sidetracked again.

'Til next time!

Thursday, January 19, 2023

Introducing Willan Dourant, my leader for a Barons' War retinue

As mentioned in a previous post, I am learning about and building forces for a new game (new to me at least): The Barons' War by Footsore Miniatures.

Those of you who read my blog (thank you both!), already know that narrative and storytelling is a huge part of the experience for me in terms of wargaming. So it should come as no surprise that I am in the process of creating characters for this game and writing their histories and backgrounds.

I admittedly do not know too much about that era of English history. I am doing a little research and listening to a few podcasts.

I don't want a baron that is historically accurate, just what I call "historically plausible." As long as he and his background are not too outrageous or unbelievable, I will be content.

So far, this is what I have come up with:

Willan and his brother, Charles, are sons of Henri Dourant. The elder Dourant was a knight from Gascony in the service of Richard. He fought with him in the rebellion against Henry II, and escaped with him from Saintes. 

After he became king, Richard granted Pevensey Castle in Sussex to Henri. 

Willan and Charles both took the cross alongside Richard, and both men joined him during the Third Crusade. Willan in particular distinguished himself at the Battle of Arsuf. 

While on crusade, Charles joined the Knights of St. John. 

Upon their return, they learned that Henri had died while they were in the Holy Land. 

Willan, as the eldest, became lord of the castle. Charles was named Knight Preceptor of Poling Preceptory. 

Willan joined the rebellious barons fighting against King John. After John's death, Willan swore fealty to Henry III and fought against Louis. 

I think this will let me field various different types of retinues, and still stay true to the background I have created.

I can add monks or even some Knights Hospitaller, to Willan's retinue to represent the assistance from his brother. I know that the Hospitallers did not actively engage in the fighting of the First or Second Barons' Wars, but I can see Charles lending his support, and at times small numbers of troops, to his brother. Again, I am not looking for strictly accurate, but rather "plausible."

Eventually, once I get the Outremer rules (I just missed the Kickstarter), I can even build retinues to represent the brothers and their men fighting in the Holy Land.

Based on the above, I have designed a shield for Willan. Charles when he appears will be in Hospitaller colors, so that's easy to sort.


Below are some other ideas I worked on before deciding on this final design and colors.


If you see anywhere that I have gone completely off the rails, or have written something that directly contradicts history, please don't hesitate to comment below or contact me directly. I am always willing to learn from those that have more knowledge than I do.

For a starting retinue I think I will go with the Beginner's Retinue by Phillip Druvins on the Footsore website, at least until I'm more familiar with how the game mechanics function together and what kind of retinue will fit my playing style.

The retinue consists of:

4 mounted knights - this includes a veteran lord with sword and shield, a bannerman, and two other knights

6 foot sergeants armed with falchions and shields

8 bowmen

8 spearmen


That's a very manageable four mounted figures and 22 infantry. I'll be converting the sergeants to be armed with falchions, but the rest should consist simply of assembling the models as intended.

In addition, those seem like a pretty decent core of troops around which to build my overall army. I can substitute out some units for specific tasks, or add more units as I play higher-point games.

Now that I've got my list sorted, it's time to assemble and paint the troops.

'Til next time!

Wednesday, January 18, 2023

Making a falchion using broom bristles

Following up on my post from yesterday, I am now using the broom bristles not to repair a weapon, but rather to make a completely new one.

There were several comments, here and in social media, about using the bristles to repair swords as well as spears.

Right now, I am in the process of building a retinue for The Barons' War using plastic figures from Fireforge. I like the figures quite a bit, but I noticed one omission. Falchions are very useful weapons to have in your baronial retinue, but the Fireforge models do not come with them.

A falchion is a single-edged sword, rather than the typical double-edged sword more commonly found on medieval models. In The Barons' War rules, the falchion has a special ability whereby defending units in lighter armor have a penalty to their defense due to the slashing nature of the attack.

I did a little quick internet research, and discovered that Durham Cathedral has a surviving falchion in its collection.

The Conyers Falchion

Looking at the shape of the blade I felt that I could replicate it, or at least get close, using the broom bristles.

Step 1: Flatten a portion of a synthetic broom bristle with the flat pliers.

Sword arm, and flattened bristle.

Step 2: Carefully cut the sword blade off of the arm, leaving the hilt, and drill a hole into the hand for the new blade.

Hole drilled for new blade.

Making sure the hole was centered is crucial.

Step 3: Trim the falchion blade to shape and clip it, leaving a small stub of round bristle to fit into the hole.

Arm and blade ready to be attached.

Step 4: Glue the blade into the hole. Once this was done I took the flat pliers and flattened the bristle all the way down to the hilt.

Falchion blade inserted into hole in sword arm.

Step 5: Assemble the rest of the figure as normal. That's it, that is all there is to it.

The proud owner of a new falchion.

The new blade is clearly distinct from the regular sword.

That should enable you to clearly identify the troops armed with falchions from those armed with normal swords. Now, all that I have to do is repeat the process seven or more times to equip the entire unit.

'Til next time!


Tuesday, January 17, 2023

Unbreakable spears and javelins for wargaming

On Saturday I played, and won, another game in our Clash of Spears campaign.

Unfortunately, though victorious, I did suffer some losses. Among them was a pair of broken javelins on my Victrix models.

I absolutely love the detail of the Victrix figures, and they are some of my favorite figures to build and paint. The only drawback is that often the spears and javelins are quite thin. While this looks great (I hate seeing troops with spears like tree trunks), it does make them rather fragile.

A while back I happened upon a Youtube video about making spears from synthetic brush bristles. On a recent trip to the Dollar Tree, I picked up a $1.25 brush head with that type of bristle in silver to see if I could make it work. The bristles are flexible, yet snap back perfectly straight!


Look at all those spears, err, bristles!

The brush has hundreds, if not thousands, of bristles (I didn't count!), and each one can make several spears and javelins, or even a long pike.


Each bristle will make several weapons.


As mentioned, the bristles are very flexible. They do have a point at which you can bend a crease into them, but I do not think that will ever be an issue in this application.

Flexibility!

When released, the bristles snap back to their original straight glory.


And resilience!

After initially cutting a bristle from the cheap brush, I decided to see if there might be other options. I went to the local Walmart, and discovered that yes, indeed, I had choices. I found a pair of brooms with thicker bristles. These cost a bit more (around $11 to $13) but remember that they will likely provide enough spears to last a lifetime.

I removed a bristle from each brush for comparison:

Detail of the various diameters of bristles I found.

To make the pointed tip of the spear, I started by using a pair of small pliers to crush a flat section into the bristle.

The flat section is at center.


Close-up of the flat section.

I used a regular pair of nippers to cut a wedge shape into the flat section to represent the point. I know the new spears will not have the same level of detail as the originals, but I think their sturdiness will outweigh that fact. Additionally, at tabletop distances I'd be willing to bet most people won't even notice.


Spears cur from the various thickness of bristles.


I think that in most cases, the middle bristles will be the best. They are just a tiny bit thicker than the Victrix javelins, and just about perfect for the spears. I think, though I will need to experiment, that I can use the thicker bristles to fashion sword blades and repair those in the same way, if needed.

Medium bristle compared to a Victrix spear.

So with bristles in hand, I set off to work on one of my unfortunate casualties. This Numidian lost part of his javelin during Malchus's victory over Marcos and his Greeks last weekend.

Broken javelin? I can fix that!

Once I clipped the remaining portion of the javelin and drilled a small hole in the horseman's fist, it was a simple matter to insert the new javelin and secure it with a drop of glue. 

New bendy javelin in place.


The javelin man is no longer just a man, he has a new javelin as well!

After a quick touch of paint, they are good to go. And, bonus, since the bristles are silver I didn't paint the spear tips.

Sorted.

Note, that I do not plan on being proactive about changing out all my javelins and spears. I will replace them when and if they break. Doing this for ALL my figures would be a nightmare for me.

I think this method will be most useful for longer-shafted weapons such as pikes, but it works great for shorter javelins and spears.

I hope you find this information useful.

'Til next time!

Monday, January 16, 2023

Vengeance tastes sweet (Malchus wins another battle, barely)

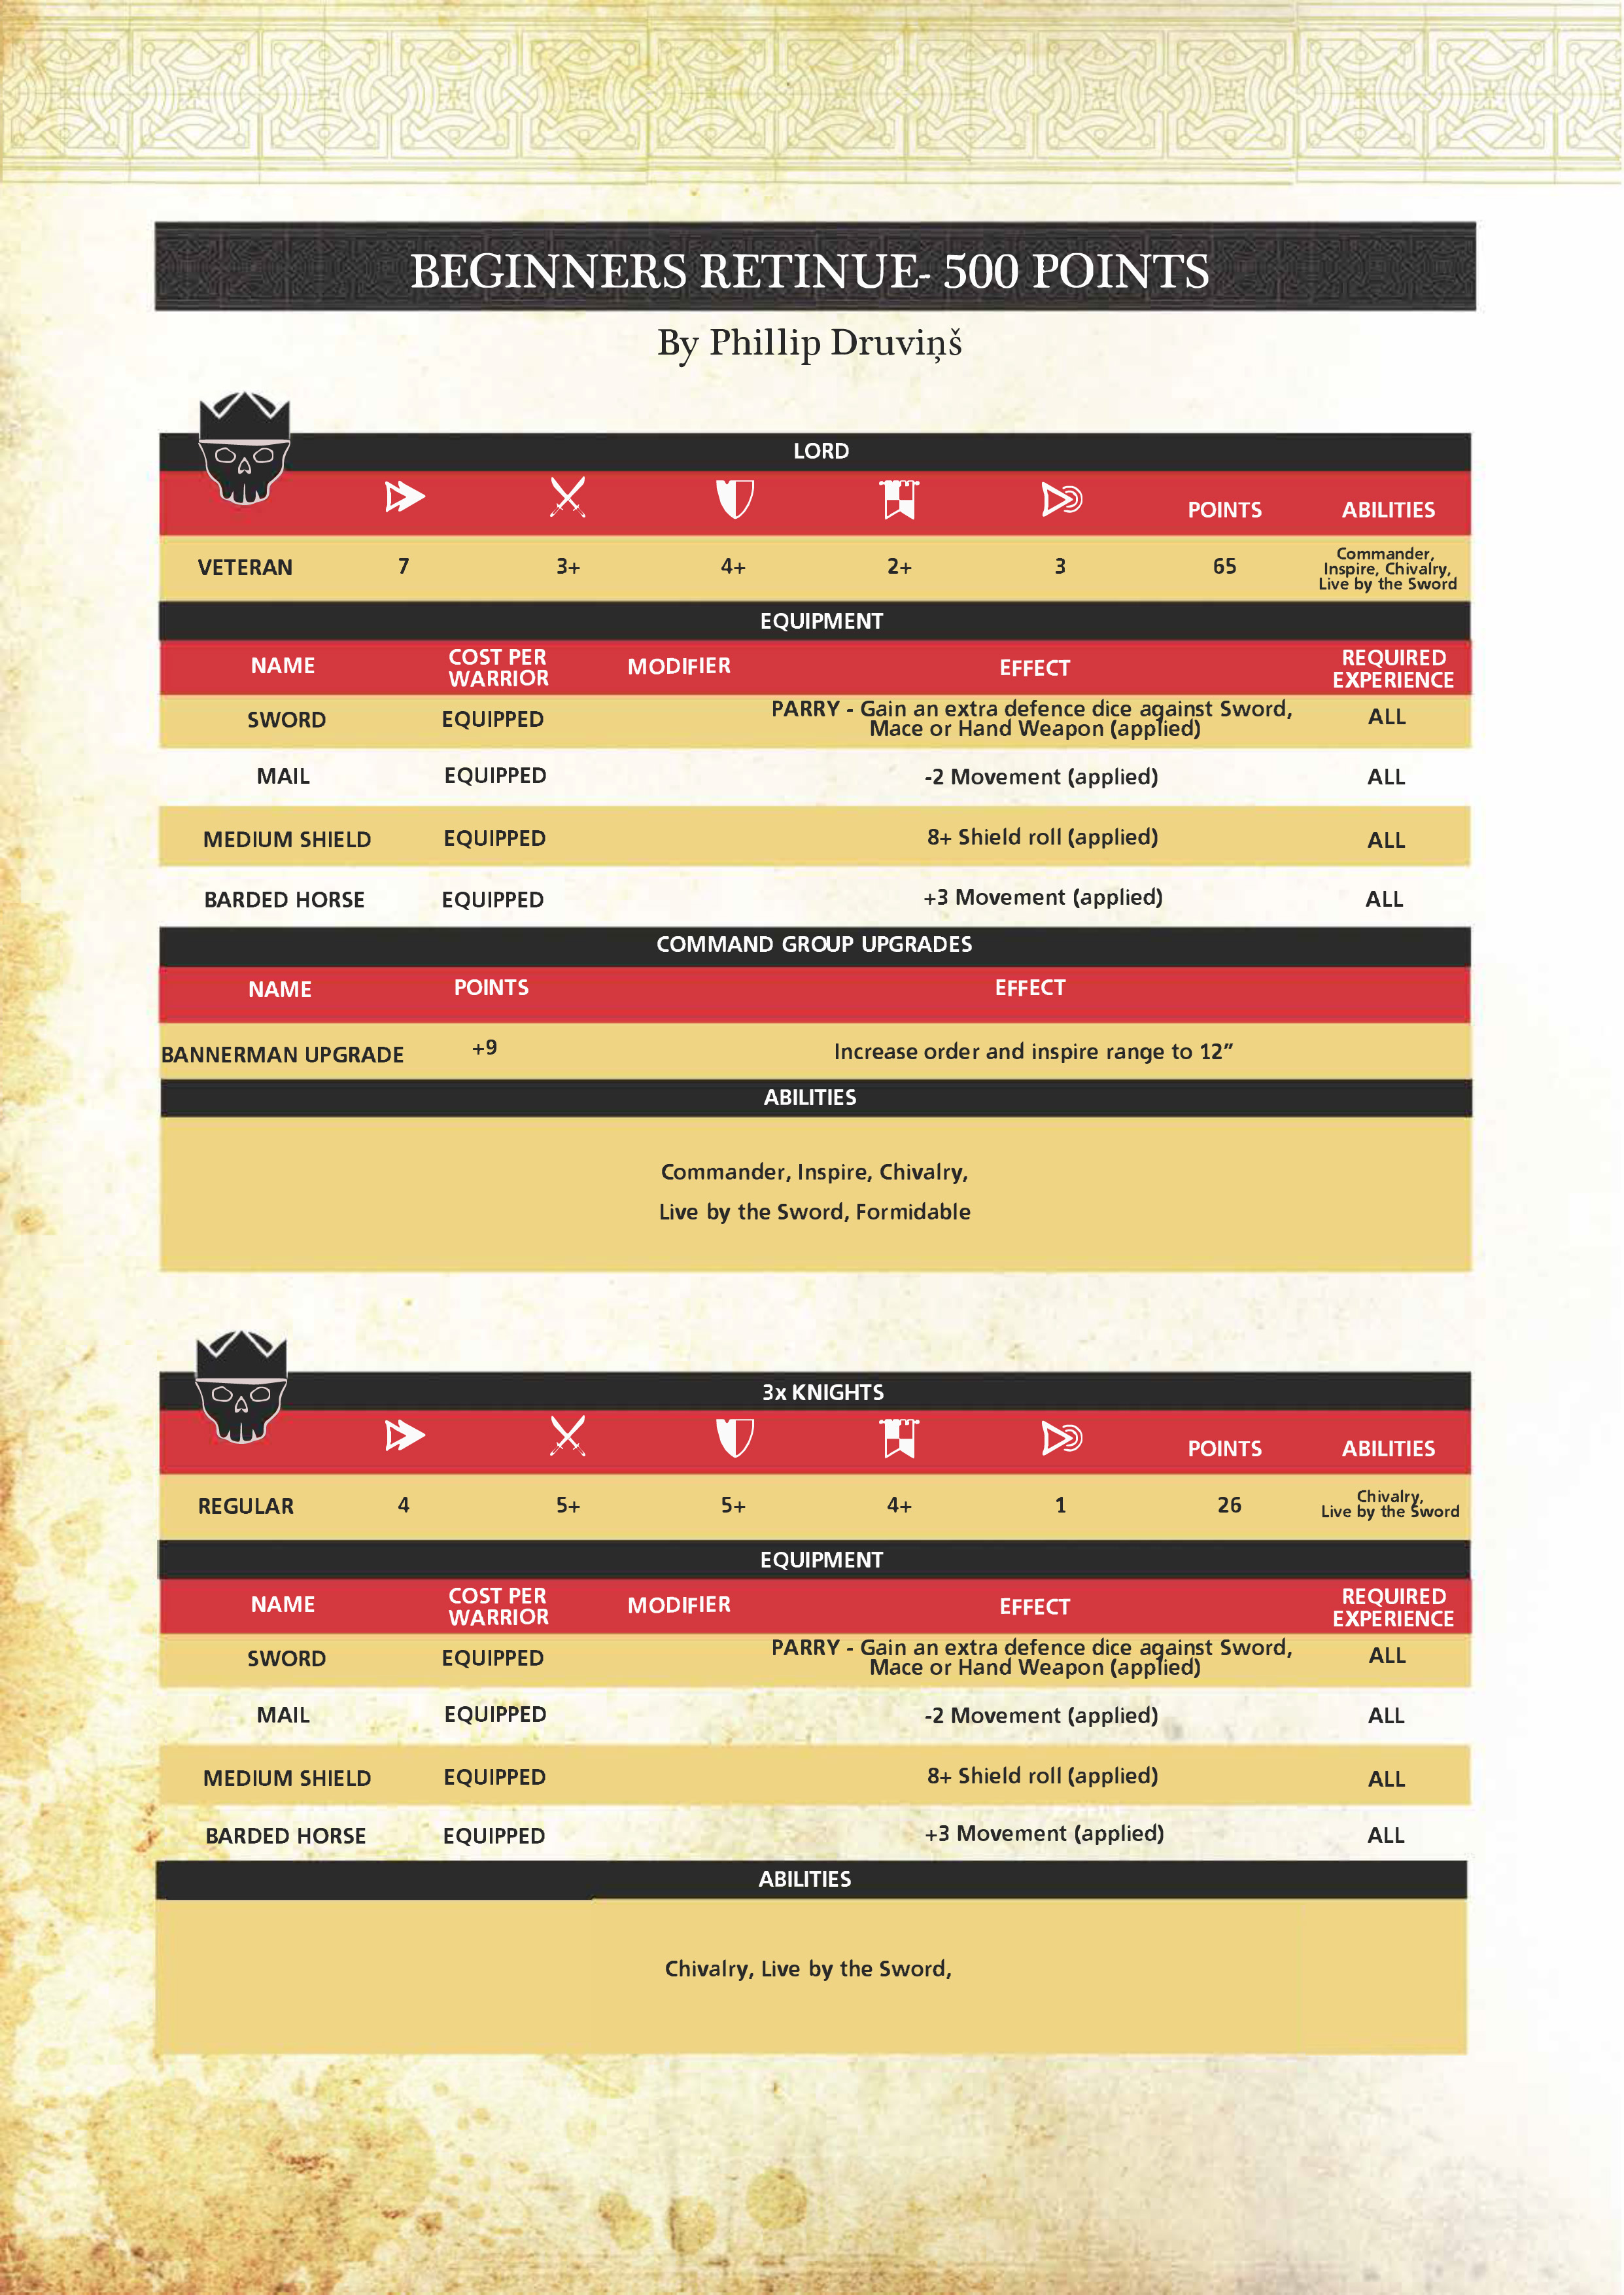
That's a good-looking army.

Last Saturday I was able to get in a game for our Clash of Spears campaign. I'd already played a couple of games this turn, and fortunately won both, so I did not really need another. But Marcos had not yet played his Turn 2 game, so I accepted his challenge.

Despite my disadvantage of "impetuous," which results in a penalty during the roll to choose the scenario, I won and of course selected "Pre-battle scouting." My cavalry would give me the edge tactically in this scenario, and I would need every advantage I could get against Marcos and his Greeks.

Having determined the scenario, we set up the terrain, and the battle commenced!


The initial deployment, with the Carthaginians towards the bottom.

The Greek archers hide in the woods.

________________________________________

The sun was still overhead but had begun its descent towards the horizon as Malchus trotted alongside his troops. 

They were advancing on a small settlement, seeking any sign of enemy activity. Hannibal Gisco, the overall Carthaginian commander, had been impressed with Malchus' success in the last scouting mission, and had ordered him to the front once again.

And once again, Malchus had sought reassurances from his seer, Menestar. And, as expected, the signs had again been cryptic.

"Time to face another foe,

but take care, lest he bring you woe.

Familiar he is, you've clashed before,

Pain he caused, and he seeks more.

Temper your anger, control your rage,

do not recklessly seek to engage.

Win or lose, life or death,

are yours to decide with every breath."

Malchus was annoyed at the vagaries of the prediction, but so far Menestar had been accurate in his visions. And after the battles his ramblings had made perfect sense. The challenge was to decipher them before the combat, so he could take advantage of their wisdom.

"My lord," Juba shouted as he rode up. He had been scouting ahead of the column with his Numidian cavalry. "We have sighted the enemy. They have taken positions along that line of trees behind the buildings."

Malchus strained to see. He could just make out the copse of palms that Juba had described. And yes, he saw movement among the trees.

"Whom do we face? Have you identified them yet?" Malchus asked his scout.

"Oh yes, my lord," Juba replied with a wicked grin. "Greeks, the same ones you fought at Messana!"

Malchus looked at Juba before responding with the same expression. "Excellent," he said, "Now we can teach those bastards a lesson."

____________________________________

Marcos deployed his forces conservatively, in a line along a stand of forest behind the houses. From there it would be difficult for him to break past and accomplish the scouting objectives. Meanwhile, my Numidians should be able to score at least one scouting marker. Assuming then that I could withstand Marco's attacks and keep my army from breaking, that should be enough for the win.

____________________________________

Malchus strode along the line behind his spearmen, He had countered the Greek's deployment with a conservative formation of his own. Apart from his Numidians, his men were in a line with the spearmen screened by the javelin men.

Juba and the Numidians had their orders. They were to race around the flanks to scout the rear, and then return. He had been absolutely clear on that. He would not allow a repeat of the last scouting mission, where the Numidians, in their overconfidence and exuberance, had allowed themselves to be picked off by the enemy missile troops. Juba knew that a repeat of that fiasco would result in dire consequences.

Speaking of missile troops, he could see a unit of archers, some slingers, and some peltasts armed with javelins. Damn. Malchus' spearmen were formidable once they got into close combat, but the would suffer losses as they advanced.

So be it, he thought. We are in Rasap's hands. Now it's time to shed some blood.

Troop positions after Turn 1. Marcos's troops are still mostly in the shadow of the woods, while the Numidians make a run for the opposite table edge.

____________________________________

My Numidians accomplished their task with ease. They were threatened by the slingers, but were able to react to the enemy's activation and move out of range, forcing the slingers to use another action to close before shooting. One cavalryman fell to the stones, but no more.

At the end of the turn, the Numidians were still within range of the slingers. I definitely did not want Marcos to win initiative, knowing that he would attack them again. So I bid two command points on the initiative roll to improve my chances of winning, and it worked.

Thus, with the scouting token in hand, the horsemen raced back behind the Carthaginian lines.

_____________________________________

On his left, Malchus could see the Numidians make their run for the opposite side of the battlefield. Though the enemy slingers tried to stop them, the bulk of his horsemen survived and turned to race back with their prize: valuable information on the enemy deployment.


Despite losing a man, the Numidians skirt back past the slingers to safety.

The cavalry safely back behind their lines.

In the center, the enemy commander seemed content to wait and allow Malchus to make the first move. Knowing that he had the advantage since none of the enemy troops had gotten past his own lines, Malchus was content to try and wait out the foe.

______________________________________

In turns two and three, Marcos passed early on, hoping I think to draw me in and then use his remaining command points to attack me when I would not be able to react. I called his bluff and passed as well, ending turns 2 and 3 very quickly. 

At this point, Marcos realized that I had the advantage since I had a scouting token, and he began to move his troops forward some.

_____________________________________

Finally, movement ahead! Malchus could see the enemy start to stir.

"Bostar! Send in the javelin men," he called out.

"Yes, sir, right away," Bostar responded instantly.

The Libyan tribesmen began to move forward and started launching their missiles. They had little effect on the enemy, many of whom were still in the shadows of the woods. A few of the damned archers fell, but not enough, dammit, not enough!

The foe accepted the challenge, and the Greeek archers and hoplites responded. The javelin men were soon chased away by their Greek counterparts, fleeing back towards the Carthaginian lines.

On the left, he saw Juba.

"Numidians!" Malchus cried out. "Kill those damned slingers!"

Immediately Juba ordered the horseman to attack. Time after time they threw their javelins, causing some casualties, but not enough to break the enemy unit

He'd watched enough! Malchus ordered his spearmen to advance in close order, shields forming a wall against the enemy missiles.

______________________________________

I misplayed the last two turns. Marcos has an affinity for missile-armed troops. Apart from two small units of hoplites (six men each), all of his troops have missiles of some sort. The slingers and archers in particular, with their longer range, are a special threat.

I tried to engage his missile troops with my own, but I was woefully outclassed. The better range of the archers, coupled with the better shooting score of the peltasts, meant that I took a lot of casualties. Both javelin men units quickly were routed.

In my mind, I see skirmish units as ranging ahead of the main line of troops, engaging and weakening the enemy before fading back.

Perhaps it is best to keep them behind the shield wall, wait until the spearmen have (hopefully) disrupted the enemy line, and then attack with them to finish off the foe. I may have to try that next time to see how it works.

But for now, onto Turn 5...

_________________________________

With their screening skirmishers gone, the spearman advance in ordered ranks.

One unit of spearmen charges into the peltasts, breaking formation. They did not kill enough Greeks to break the enemy unit.

With their screening skirmishers gone, the spearmen moved ahead. Despite their heavier armor, the spearmen on the left were unable to break the peltasts. Charged in turn by the hoplites, they broke as well, running past Malchus as they fled.

"Dogs! Curs! Bastard sons of bastard fathers!"

Despite his curses, the men would not stand and fight.

One detachment of spearmen remained to hold the rapidly disintegrating Carthaginian line, and the Numidians still posed some threat on the left. But, by the gods, things looked grim.

The sun was low in the sky at this point, the tall trees casting even longer shadows across the field. Visibility was worsening, it was obvious that despite his successes, the Greek commander had no stomach for further bloodshed.

Accepting the respite, Malchus ordered his remaining troops to fall back. Victory, no matter by how slim a margin, was sweet. Especially against a foe that had bested him in their last encounter.

More importantly, the intelligence on enemy troop dispositions would be valuable, and Hannibal Gisco would be grateful. Malchus began to ponder how he could capitalize on that gratitude.

The Numidians taunt the enemy. They only got away with it because the game ended!

_________________________________

With my army falling apart at the seams, I failed my break test at the end of Turn 5. Thanks to my Zeal asset, I automatically pass the first test of the game despite the actual roll. But another turn would almost certainly cost me the game. The outcome of this game would literally rest on the end of game roll...

Marcos rolled a 6, and I rolled a 1... an odd total, so the game ended!

Troop positions at the end of the game.

Despite having accumulated more break points (3 to Marcos's 2), I achieved a minor victory because I held a scouting token.

Marcos and I each made mistakes during the game. He played very conservatively the first few turns, content to sit back. This allowed me to secure the scouting token and then keep passing, advancing the game turns towards a conclusion. A conclusion that benefited me since I held a token.

I should have not attacked his slingers with my Numidians. I got away with it, because Marcos fixated on my javelin men and spearmen and used his hoplites to attack them. Had he sent them into my Numidians, they likely would have routed, costing me the scouting token that was the key to victory.

In the center, as mentioned, I misplayed my combination of troops. I played them the way I envisioned them working, and not the way they actually work in the game. Large concentrations of enemy missile troops are a very tough nut to crack, in my opinion.

All of Marcos's missile troops consist of nine models, so he only has a dozen hoplites without a ranged attack. And 18 of those troops have a range of 12" or greater. That's a well-designed force that thrives on causing casualties at a distance and weakening the enemy for the coup de grace by the heavy hoplites.

Once he began to attack, Marcos started beating me. As I said, I doubt I could have withstood another turn of combat.

Sometimes it really is better to be lucky than good.

'Til next time!

Saturday, January 14, 2023

Getting started in "The Barons' War"


Lately I've been reading a lot of online buzz about a game from Footsore Miniatures called "The Barons' War." The game has been out for a while now, and there have been, I think, four very successful Kickstarters for it.

I became more intrigued recently after seeing some posts on Facebook. The basic "retinue," which is what a force is called, can run from about 25 to 50 figures depending on the point level of the game. That's right in my comfort zone in terms of number of figures.

I don't know too much about the time period covered by the game, apart from having watched several iterations of "Robin Hood." But that can be remedied with a few good books.

There is a main rulebook for the game, The Barons' War, that contains the basic rules for playing out battles, creating your retinue, etc.

There are also a pair of supplements, Death & Taxes and Outremer. The first contains a campaign and rules for outlaw bands. The latter, of course, deals with the Crusades. Outremer has just released, so I've not yet had a chance to read it. I have always wanted a Hospitaller force, so I'll be looking to pick this up soon.


Footsore has also produced four mini campaign books along with accompanying figures of the main characters in each. These look like a lot of fun, though I've not yet gotten my hands on any.

Footsore produces a line of figures for the game, of course, and they are beautiful. They come as individual figures for the characters, or packs of four for the troops. You can also get a whole basic retinue.

You can use any figures you wish, however, and there are some other good options. Fireforge produces a line of plastic figures that are suitable, and more economical.

There are also some 3D print designers that have models appropriate to this era. You can spend as much or as little as you wish.

For myself, I will probably mix and match from several sources to complete my retinues.

In order to "get my feet wet" with this game, I picked up a box of Fireforge Foot Sergeants at Gigabytes. At $50 for 48 figures it's about as inexpensive as you can get, per figure.


Each of the six sprues contains eight bodies and an assortment of weapons. There are six hand weapons (two swords, two axes, two maces), six spears, and four crossbows on each sprue. You also get a selection of heads and shields.

Sergeants seem to be a fairly basic building block in most retinues I've seen. I've decided to start by assembling four figures with hand weapons. That's enough to experiment on and try to get a paint scheme that I like. 

I'm sure that as I read and become familiar with the rules I'll figure out how best to equip them to have a decent core of troops. I'll be looking to add some knights, mounted and on foot, to add some punch, as well as some more common folk to bulk up the numbers.

I have always been fond of skirmishing cavalry armed with missile weapons. I am not sure which troops best fit that role in The Barons' War (perhaps mounted Sergeants with crossbows?) but I am sure I will figure it out.

As I've mentioned, I don't really know much about this time and place in history. Heraldry is a mystery to me so I don't really know in which direction to go. Because I'm generally not a stickler for strict accuracy, I'll probably invent my own character to lead the retinue and just design a heraldry and color combination that looks decent. From my reading, I'll try to come up with a background that makes sense.

Here are the first four figures I assembled, awaiting basing and priming:

Hopefully they'll have some color to them for my next post on The Barons' War.

Don't worry though, fans of Malchus, despite a holiday- and COVID-induced hiatus, the Clash of Spears campaign is still in full swing, and your favorite intrepid Carthaginian madman will be back with more adventures soon!

'Til next time!